
As with any electronic device, e-bike batteries can fail from time to time. This is where the Battery Management System (BMS) comes in.
The BMS is responsible for managing and regulating the battery’s charge and discharge cycles to ensure its longevity and safety.
If your E-bike battery isn’t performing as well as it used to, resetting the BMS might help.
In this blog post, we’ll discuss the signs that indicate your E-bike battery BMS needs a reset, the steps involved in resetting it, and some tips to maintain your E-bike battery BMS for optimal performance.
Table of Contents
Why Reset E-Bike Battery BMS?
Knowing when to reset your E-bike battery BMS can help you avoid potential issues and ensure optimal performance.
- If you notice that your battery isn’t holding a charge as well as it used to or isn’t providing the same level of power, it may be time to reset the BMS.
- If you’ve recently replaced the battery or made any changes to your E-bike’s system, resetting the BMS can help calibrate the battery to your bike’s system and ensure that it’s performing optimally.
- It’s also recommended to reset the BMS after a long period of inactivity or if the battery has been stored for an extended period.
By resetting your E-bike battery BMS at the right time, you’ll be able to restore its performance and ensure a smoother and more reliable ride.
How to Reset an Ebike Battery BMS?
In order to reset ebike battery BMS, make sure you have both the battery and a charger with you. There are two ways to reset the BMS of the battery:
- External reset
- Internal reset
We will provide a step-by-step guide on both methods.
How to Reset E-Bike Battery BMS Externally
Tools required:
- Voltmeter/multimeter
- Soldering iron
- Wire cutter
- Electricity resistant gloves
Materials required:
- DC barrel jack receptacle
- Electrical wire (red & black)
- Electrical tape
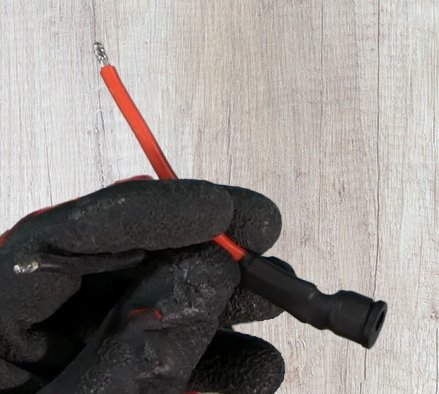
Step 1 – Create an adapter
To create an adapter, take the DC receptacle and solder red wire to its + terminal and black wire to its – terminal.
The adapter will help us charge the battery through its discharge port.
Step 2 – Test the adapter
- Plug in the battery charger.
- Connect the battery charger to the adapter you just made.
- Make sure the bare wire ends of the red and black wires don’t touch.
- Use the voltmeter to test the connection.
- Place the black pin of the voltmeter on the black wire and the red pin on the red wire.
- In this step, electrician gloves are useful.
You should see a positive voltage reading. If so, the adapter works. If you see a negative reading, you most probably connected the wires to the wrong terminals in the receptacle.
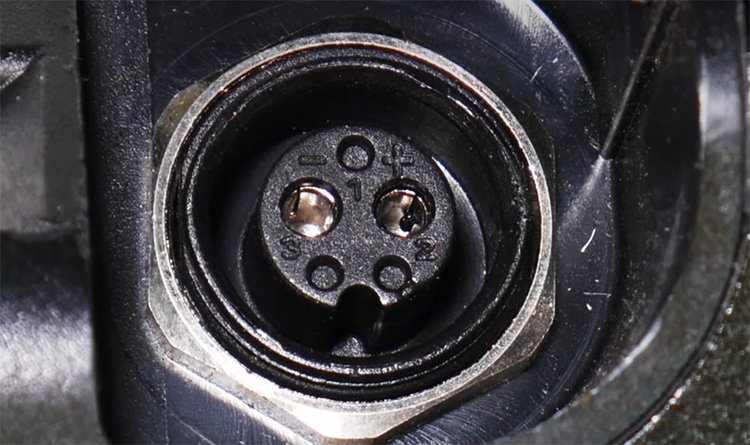
Step 3 – Resetting the BMS
Look for the discharge port of the battery. On the discharge port, you will see positive and negative terminals. Plus and minus signs indicate which is which.
- Plug the battery charger into the adapter. (Just like in the testing process)
- Connect the red wire of the adapter to the positive terminal and the black wire to the negative terminal of the battery’s discharge port.
- If the wires are connected, the light on the charger should turn red.
- Hold the wires in place for 15 seconds in order to reset the BMS.
After that, the resetting of the battery’s BMS is completed. Now, you should test the battery if it works correctly. If the battery works, your job is done. If the battery still doesn’t work, you can try resetting the battery internally.
How to Reset E-Bike Battery BMS Internally
Tools required:
- Phillips screwdriver
- Flat head screwdriver
Step 1 – Remove the top cap of the battery
We need access to the BMS chip. For that, we must open the battery. Usually, there are 4 screws on the top of the battery. Use the screwdriver to remove the screws and remove the top cap of the battery.
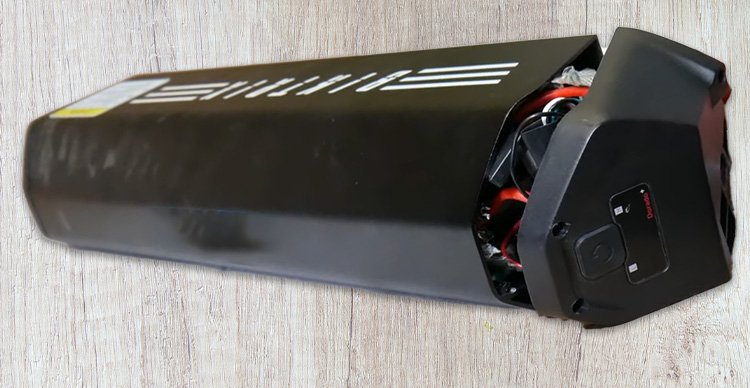
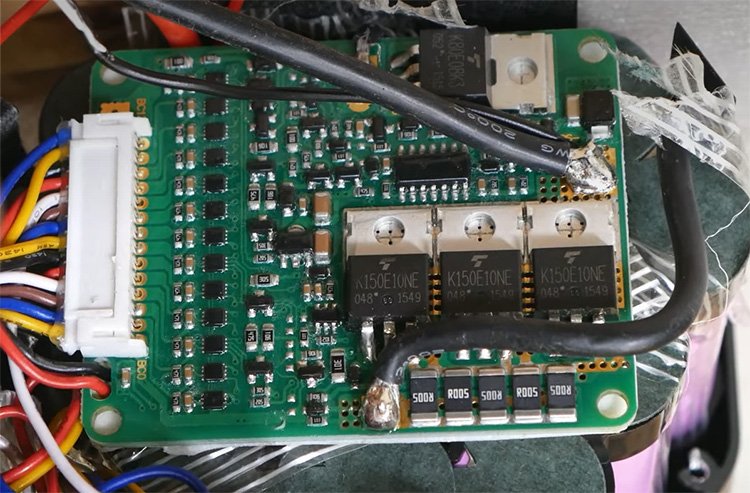
Step 2 – Locate the BMS chip
To locate the BMS chip, you must slide out the battery cells for a couple of inches. After that, you should clearly see the chip.
If you are unable to slide out the cells, open the bottom cap of the battery so you could push from the bottom.
Step 3 – Resetting the BMS
- Locate the wiring harness on the BMS chip.
- Disconnect the wiring harness from the BMS chip. You may need a precision flathead screwdriver to make the harness free.
- Make sure you don’t pull the harness from the wires. It could damage the connections.
- Next, connect the charging cable to the battery.
- While the charger is connected to the battery, reconnect the wiring harness to the BMS chip. Push gently from both sides until it clicks into place.
After reconnecting the wiring harness, the battery should be reset. Now, you should put the battery back together and check if it works correctly.
In the video below, you can see how resetting the BMS of the ebike battery looks in reality:
Tips for Maintaining Your E-Bike Battery BMS
1. Regularly check the battery’s state of charge
By regularly monitoring your battery’s charge levels, you can prevent it from fully discharging, which can damage the battery and decrease its overall lifespan.
Additionally, knowing the battery’s state of charge will help you plan your rides better and avoid getting stranded with a dead battery.
A simple way to check your E-bike battery’s state of charge is by using the battery level indicator on your bike’s display. Make it a habit to check your battery’s charge level before every ride
2. Avoid fully discharging the battery
When you fully discharge your battery, it puts a lot of stress on its cells. It can lead to irreversible damage and a significant reduction in its capacity. Additionally, fully discharging your battery can also affect its performance and make it less reliable.
It’s recommended to recharge your battery when it reaches 30-40% of its capacity to ensure optimal performance and longevity. By avoiding full discharge, you’ll be able to enjoy a longer-lasting and more reliable E-bike battery.
3. Keep the battery at a moderate temperature
Extreme temperatures, whether hot or cold, can negatively impact the battery’s cells and reduce its capacity and lifespan.
High temperatures can cause the battery to degrade faster, leading to a shorter lifespan and decreased performance. On the other hand, extremely cold temperatures can cause the battery’s cells to freeze and damage the internal components. It will lead to a loss of capacity and overall performance.
4. Store the battery properly
When not in use, storing the battery in the right conditions can prevent it from degrading and losing its capacity.
The ideal storage conditions for an E-bike battery include a cool, dry place away from direct sunlight and heat sources. It’s important to avoid storing the battery in extreme temperatures.
Additionally, it’s essential to store the battery at a partial charge level, ideally between 30-60% of its capacity. This helps to prevent the battery from fully discharging or overcharging.
By storing your E-bike battery properly, you’ll be able to extend its lifespan and ensure that it’s always ready for your next ride.
Conclusion
Resetting your E-bike battery BMS can help restore its performance and ensure longevity. It’s crucial to regularly check your battery’s state of charge, avoid fully discharging it, and store it properly to maintain its overall health.
By following the steps provided in this blog post, you can easily reset your E-bike battery BMS and get back to enjoying a reliable ride.
Remember that proper maintenance of your E-bike battery BMS is key to maximizing its lifespan. So, take care of your E-bike battery, and it will take care of you!

The founder of Electric Wheelers and the creator behind its YouTube channel.
He has spent the past 5+ years riding, testing, and figuring out electric scooters and e-bikes in real-world conditions — not just reading spec sheets.
Instead of chasing trends, he focuses on practical questions:
What actually works? What breaks? And what is worth your money?
Most of the content is based on personal experience, with the goal of helping others avoid mistakes and make better decisions.

Reality is the discharge port and charge port for a lot of scooter are the same. When you connect charger to the discharge port which is nearly the same as your conventional charging. Thus the first approach does not make sense.
Thank you for this very good explanation. What are next steps when resetting BMS does not fix it and all the voltages in each group are identical? Replace the BMS? How do you test the temperature probes,?